ROS 2 Jazzy Tutorial for Beginners: Setup, Nodes & First Robot (2026)
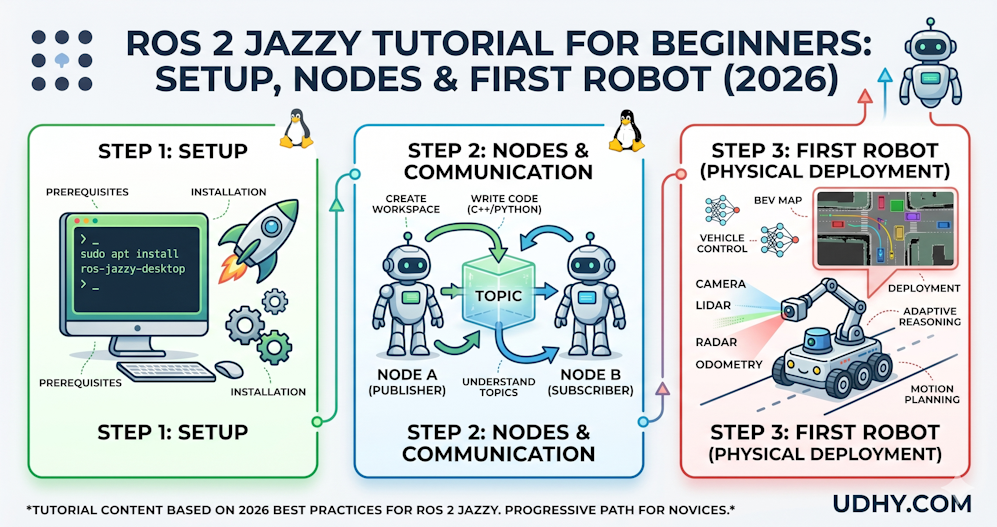
ROS 2 Jazzy is a practical starting point for learning modern robot software development. This beginner tutorial walks through installing ROS 2 Jazzy on Ubuntu 24.04, creating a workspace and Python package, building publisher and subscriber nodes, inspecting the ROS 2 graph, and running a robot simulation with Gazebo.
The guide also connects these fundamentals to autonomous-vehicle and robotics architectures, based on UDHY’s practical experience in autonomous systems.
TL;DR — Quick Insights
- ROS 2 Jazzy is the LTS: Released May 2024, Jazzy Jalisco is the long-term support distribution of ROS 2 — the version you should learn in 2026 for any serious robotics project.
- Ubuntu 24.04 is required: Jazzy runs natively on Ubuntu 24.04 LTS (Noble Numbat). If you are on Windows, WSL2 or Docker both work well.
- Nodes are the building blocks: Every ROS 2 application is a graph of nodes — small, focused processes that communicate by publishing and subscribing to named topics.
- Python first, then C++: Start with Python (rclpy) for speed of learning. Migrate to C++ (rclcpp) once you need real-time performance in production systems.
- Simulation before hardware: Use Gazebo Harmonic or Webots to simulate your robot before touching physical hardware — cheaper, faster, and endlessly repeatable.
Introduction: Why ROS 2 and Why Jazzy?
If you want to build autonomous robots in 2026 — whether that is a warehouse delivery drone, a surgical assistance arm, or a self-driving campus shuttle — there is one framework you need to know: ROS 2. The Robot Operating System 2 is not an operating system in the traditional sense. It is an open-source middleware and toolchain that provides everything a robotics developer needs: communication infrastructure, hardware abstraction, simulation tools, visualisation, and a rich ecosystem of ready-made packages for navigation, perception, and control.
ROS 2 was rebuilt from scratch compared to ROS 1, addressing every major limitation of its predecessor: real-time support, multi-robot networking, improved security through DDS (Data Distribution Service), and production-grade reliability. ROS 1 is now in maintenance-only mode. If you are starting today, you start with ROS 2.
Within ROS 2, the current long-term support (LTS) distribution is Jazzy Jalisco, released in May 2024 and supported until May 2029. Jazzy introduces native support for Ubuntu 24.04 LTS, improved DDS performance through Zenoh transport layer experiments, enhanced Nav2 navigation stack with better path smoothing, and tighter integration with Gazebo Harmonic. Learning Jazzy means your knowledge is stable, supported, and directly applicable to production robotics for the next five years.
Prerequisites: What You Need Before You Start
Before installing ROS 2 Jazzy, ensure you have the following:
- Ubuntu 24.04 LTS (Noble Numbat) — either natively installed, in WSL2, or in a virtual machine.
- Basic Python knowledge — you should understand variables, functions, classes, and loops.
- Basic Linux terminal comfort — navigating directories (cd, ls), running commands, and editing files.
- 8 GB RAM minimum, 16 GB recommended for running Gazebo simulation alongside ROS 2 nodes.
⚠️ Windows Users: For this tutorial, we use Ubuntu 24.04 LTS, which is the recommended platform for the installation steps below. Windows users can use a supported alternative such as WSL2 where appropriate; follow the current ROS 2 documentation for platform-specific installation instructions.
Step 1: Installing ROS 2 Jazzy on Ubuntu 24.04
Open a terminal and follow these steps exactly. Each command is explained so you understand what it does — not just what to type.
1.1 Set Up Locale
ROS 2 requires UTF-8 locale support. Run:
locale  # check for UTF-8
sudo apt update && sudo apt install locales
sudo locale-gen en_US en_US.UTF-8
sudo update-locale LC_ALL=en_US.UTF-8 LANG=en_US.UTF-8
export LANG=en_US.UTF-8
1.2 Add the ROS 2 Repository
sudo apt install software-properties-common
sudo add-apt-repository universe
sudo apt update && sudo apt install curl -y
sudo curl -sSL https://raw.githubusercontent.com/ros/rosdistro/master/ros.key \
  -o /usr/share/keyrings/ros-archive-keyring.gpg
echo "deb [arch=$(dpkg --print-architecture) \
  signed-by=/usr/share/keyrings/ros-archive-keyring.gpg] \
  http://packages.ros.org/ros2/ubuntu \
  $(. /etc/os-release && echo $UBUNTU_CODENAME) main" | \
  sudo tee /etc/apt/sources.list.d/ros2.list > /dev/null
1.3 Install ROS 2 Jazzy Desktop
sudo apt update
sudo apt upgrade
sudo apt install ros-jazzy-desktop
The desktop install includes RViz2 (visualisation), rqt tools, and Gazebo bindings. It takes 5–10 minutes on a fast connection.
1.4 Source the Setup File (Every Terminal Session)
# Add to ~/.bashrc so it runs automatically
echo "source /opt/ros/jazzy/setup.bash" >> ~/.bashrc
source ~/.bashrc
# Verify installation
ros2 --help
✅ Quick Verification Test: Run
ros2 run demo_nodes_py talkerin one terminal andros2 run demo_nodes_py listenerin another. If you see “Hello World” messages flowing between them, your ROS 2 Jazzy installation is working perfectly.
Step 2: Core Concepts — The ROS 2 Architecture
Before writing a single line of code, every robotics or autonomous vehicle team must understand the four core concepts that power every ROS 2 application. These fundamentals are the foundation for building, scaling, and deploying systems at any level — from small robots to full‑scale autonomous fleets.
2.1 Nodes
A node is a single executable process with a specific purpose. In a robot, you might have separate nodes for: reading the LiDAR sensor, processing the camera image, running the path planner, and commanding the wheel motors. Each node is independent and communicates with others through the ROS 2 graph.
2.2 Topics
Topics are named communication channels. A node publishes messages to a topic, and any number of other nodes can subscribe to that topic and receive those messages. Topics are asynchronous — the publisher does not wait for subscribers to receive the data.
2.3 Messages
Messages define the data structure sent over a topic. ROS 2 ships with hundreds of standard message types: sensor_msgs/LaserScan for LiDAR data, geometry_msgs/Twist for velocity commands, nav_msgs/OccupancyGrid for maps. You can also define custom message types.
2.4 Services
Services provide request-response communication — unlike topics which are fire-and-forget. You call a service, it processes your request, and returns a result. Use services for operations that need confirmation: asking the robot to navigate to a goal, saving a map, or resetting a sensor.
| Concept | Communication Type | Use Case | ROS 2 Tool |
|---|---|---|---|
| Topics | Publish / Subscribe (async) | Sensor streams, motor commands, camera frames | ros2 topic echo |
| Services | Request / Response (sync) | Navigation goals, map saving, sensor reset | ros2 service call |
| Actions | Goal / Feedback / Result | Long-running tasks: move arm, navigate room | ros2 action send_goal |
| Parameters | Key-value configuration | PID gains, speed limits, update rates | ros2 param set |
Step 3: Creating Your First ROS 2 Workspace and Package
3.1 Create the Workspace
mkdir -p ~/ros2_ws/src
cd ~/ros2_ws
colcon build
source install/setup.bash
3.2 Create a Python Package
cd ~/ros2_ws/src
ros2 pkg create --build-type ament_python \
  --license Apache-2.0 \
  my_first_robot
cd my_first_robot
Your package structure will look like this: my_first_robot/my_first_robot/__init__.py, package.xml, setup.py, and setup.cfg. This is the standard ROS 2 Python package layout.
Step 4: Writing a Publisher Node
A publisher node sends data to a topic. In this example, we build a simple sensor simulator that publishes a temperature reading every second.
# udhy_first_robot/temperature_publisher.py
import rclpy
from rclpy.node import Node
from std_msgs.msg import Float32
import random

class TemperaturePublisher(Node):
    def __init__(self):
        super().__init__('temperature_publisher')
        self.publisher_ = self.create_publisher(
            Float32,           # message type
            'temperature',     # topic name
            10                 # queue size
        )
        # Timer: publish every 1.0 second
        self.timer = self.create_timer(1.0, self.publish_temperature)
        self.get_logger().info('Temperature Publisher started.')

    def publish_temperature(self):
        msg = Float32()
        # Simulate sensor reading: 20–35 degrees Celsius
        msg.data = 20.0 + random.uniform(0, 15)
        self.publisher_.publish(msg)
        self.get_logger().info(f'Publishing temperature: {msg.data:.2f}°C')

def main(args=None):
    rclpy.init(args=args)
    node = TemperaturePublisher()
    rclpy.spin(node)
    node.destroy_node()
    rclpy.shutdown()

if __name__ == '__main__':
    main()
Step 5: Writing a Subscriber Node
A subscriber node listens to a topic and reacts to incoming messages. Here we build a subscriber that receives temperature readings and triggers an alert if the temperature exceeds a threshold.
# udhy_first_robot/temperature_subscriber.py
import rclpy
from rclpy.node import Node
from std_msgs.msg import Float32

class TemperatureSubscriber(Node):
    def __init__(self):
        super().__init__('temperature_subscriber')
        self.subscription = self.create_subscription(
            Float32,
            'temperature',
            self.temperature_callback,
            10
        )
        self.ALERT_THRESHOLD = 30.0
        self.get_logger().info('Temperature Subscriber started.')

    def temperature_callback(self, msg):
        temp = msg.data
        if temp > self.ALERT_THRESHOLD:
            self.get_logger().warn(
                f'HIGH TEMP ALERT: {temp:.2f}°C exceeds {self.ALERT_THRESHOLD}°C!'
            )
        else:
            self.get_logger().info(f'Temperature received: {temp:.2f}°C — Normal.')

def main(args=None):
    rclpy.init(args=args)
    node = TemperatureSubscriber()
    rclpy.spin(node)
    node.destroy_node()
    rclpy.shutdown()
Step 6: Building and Running Your Nodes
Register both nodes in setup.py, then build and run:
# In setup.py, inside entry_points, console_scripts add:
'temperature_publisher = my_first_robot.temperature_publisher:main',
'temperature_subscriber = my_first_robot.temperature_subscriber:main',

# Then build:
cd ~/ros2_ws
colcon build --packages-select my_first_robot
source install/setup.bash

# Terminal 1 — run publisher:
ros2 run my_first_robot temperature_publisher

# Terminal 2 — run subscriber:
ros2 run my_first_robot temperature_subscriber

# Terminal 3 — inspect live topic:
ros2 topic echo /temperature
ros2 topic hz /temperature   # confirm 1 Hz publish rate
Step 7: Visualising the ROS 2 Graph
One of the most powerful features of ROS 2 is the ability to visualise the entire communication graph of your robot in real time. With your publisher and subscriber running, open a new terminal and run:
rqt_graph
This opens an interactive GUI showing every node in your system as a circle, every topic as a labelled arrow, and every publisher-subscriber relationship. This graph view is invaluable for debugging complex multi-robot systems — Dr. Limbu’s team used it daily during Moovita’s Singapore AV fleet integration, where over 40 nodes communicated simultaneously across a single ROS 2 graph.
Step 8: Running Gazebo Harmonic Simulation
Gazebo Harmonic is the simulation engine paired with ROS 2 Jazzy. You can simulate a complete TurtleBot3 — a standard differential-drive research robot — without any physical hardware:
# Install TurtleBot3 simulation packages
sudo apt install ros-jazzy-turtlebot3*
export TURTLEBOT3_MODEL=waffle

# Launch simulation world
ros2 launch turtlebot3_gazebo turtlebot3_world.launch.py

# In a new terminal — drive the robot manually:
ros2 run turtlebot3_teleop teleop_keyboard
Your TurtleBot3 will appear in a simulated environment with LiDAR data visible in RViz2. You can drive it with keyboard controls, observe how the LiDAR scan changes as it moves, and experiment with SLAM — building a map of the simulated world in real time. This is exactly the simulation pipeline Moovita used before deploying software onto its physical autonomous bus fleet. learn more about Robotics for Advanced Learners — SLAM, Nav2 and Path Planning and Robotics for Experts — Fleet Management and Multi-Agent Systems.
From UDHY’s Robotics Platform: Applying ROS 2 in Production
A production autonomous-vehicle architecture may include dedicated nodes for LiDAR processing, camera perception, GNSS/IMU fusion, planning, vehicle control and safety supervision. Each component can communicate through ROS 2 interfaces while maintaining defined timing, QoS and fault-handling requirements.
Every single one of these nodes communicated through ROS 2 topics and services using the same publisher-subscriber pattern you have just learned in this tutorial. The architecture you practice here is not an educational simplification — it is the exact pattern used in commercial autonomous vehicle deployments globally.
ROS 2 Services and Clients — Request-Response Communication
While topics handle continuous data streams (sensor readings, velocity commands), services handle discrete requests that need a single response. Think of a topic as a radio broadcast; a service is a phone call — you ask a specific question and get a specific answer back.
When to use a service vs a topic:
- Use a topic for: LiDAR scans, camera frames, wheel odometry, joint states — data that flows continuously
- Use a service for: trigger a calibration routine, ask “is the robot ready?”, reset an encoder, take a photo on demand
Step 1 — Create a service server:
# ~/ros2_ws/src/udhy_beginner/udhy_beginner/service_server.py
import rclpy
from rclpy.node import Node
from std_srvs.srv import SetBool

class ReadyCheckServer(Node):
    def __init__(self):
        super().__init__('ready_check_server')
        self.srv = self.create_service(
            SetBool,
            'check_robot_ready',
            self.handle_ready_check
        )
        self.get_logger().info('Ready check service started')

    def handle_ready_check(self, request, response):
        if request.data:
            response.success = True
            response.message = 'Robot systems nominal — cleared for operation'
        else:
            response.success = False
            response.message = 'Ready check skipped'
        return response

def main(args=None):
    rclpy.init(args=args)
    node = ReadyCheckServer()
    rclpy.spin(node)
    rclpy.shutdown()
Step 2 — Create a service client:
# ~/ros2_ws/src/udhy_beginner/udhy_beginner/service_client.py
import rclpy
from rclpy.node import Node
from std_srvs.srv import SetBool

class ReadyCheckClient(Node):
    def __init__(self):
        super().__init__('ready_check_client')
        self.client = self.create_client(SetBool, 'check_robot_ready')
        while not self.client.wait_for_service(timeout_sec=1.0):
            self.get_logger().warn('Waiting for ready_check service...')
        self.send_request()

    def send_request(self):
        req = SetBool.Request()
        req.data = True
        future = self.client.call_async(req)
        rclpy.spin_until_future_complete(self, future)
        result = future.result()
        self.get_logger().info(
            f'Response: {result.success} — {result.message}'
        )

def main(args=None):
    rclpy.init(args=args)
    node = ReadyCheckClient()
    rclpy.shutdown()
Step 3 — Register both in setup.py (inside console_scripts):
'service_server = udhy_beginner.service_server:main',
'service_client = udhy_beginner.service_client:main',
Step 4 — Build and run (two terminals):
# Terminal 1
colcon build --symlink-install && source install/setup.bash
ros2 run udhy_beginner service_server

# Terminal 2
source install/setup.bash
ros2 run udhy_beginner service_client
Step 5 — Call directly from the CLI (useful for debugging):
ros2 service call /check_robot_ready std_srvs/srv/SetBool "{data: true}"Lessons Learned
- Source your setup file: The single most common beginner mistake is forgetting to run
source /opt/ros/jazzy/setup.bashin each new terminal. Add it to~/.bashrconce and never forget again. - One node, one job: Keep each node focused on a single responsibility. A node that does sensor reading, processing, and control simultaneously is hard to debug, test, and reuse.
- Simulate first, always: Before deploying any code change to a physical robot, test it thoroughly in Gazebo. Physical robots are expensive, breakable, and sometimes dangerous. Simulators are free, instant, and endlessly repeatable.
- Use rqt_graph to debug: When your nodes are not communicating as expected, open rqt_graph immediately. It will reveal topic name mismatches — the most common cause of silent communication failures — instantly.
- ROS 2 topics are not guaranteed delivery: Topics use UDP-based transport by default. For critical commands (emergency stop, safety overrides), use Services or configure your DDS QoS profile for reliable delivery.
UDHY Learning Path: From Beginner to Job‑Ready Robotics Engineer
Interested in becoming a robotics engineer and building humanoid robots? UDHY offers a structured learning path designed to help you transition from curious enthusiast to industry‑ready professional. Follow this progressive track to gain the skills, projects, and confidence needed to thrive in corporate robotics roles.
| 1. Foundation | Introduction to AI + ML Fundamentals | 3–5 hrs | Python + ML context |
| 2. Physical sandbox | Robotics for Beginners | 8–12 hrs | First physical project |
| 3. Core engineering | Robotics for Advanced | 25–35 hrs | ROS 2 + YOLO + kinematics |
| 4. Deep learning | Deep Learning for Robotics | 10–14 hrs | PyTorch + TensorRT deployment |
| 5. Navigation | Autonomous Navigation & SLAM | 12–16 hrs | Nav2 + SLAM + A* planning |
| 6. Frontier | Expert Robotics + Physical AI | 30–40 hrs | VLA models + production deployment |
FAQs on ROS 2 Jazzy
References & Authoritative Sources
- ROS 2 Official Documentation — Jazzy Jalisco.
- Open Robotics. ROS 2 Design Documentation.
- Macenski, S. et al. (2022). Robot Operating System 2: Design, Architecture, and Uses In The Wild. Science Robotics, 7(66).
- NVIDIA Isaac Platform Documentation.
- Automatic Addison. How to Create a ROS 2 Python Publisher — Jazzy.
- ROS Discourse Community Forum.
- Husarion ROS 2 Tutorials.
- Gazebo Harmonic Documentation.
- IEEE Xplore: Robotics and Automation Letters.
About the Author
Dr. Dilip Kumar Limbu Co-Founder, Moovita | Former Principal Scientist, A*STAR | PhD, Auckland University of Technology
Connect via LinkedIn Direct Inquiry.
Disclaimer
The views expressed here are personal and based on 25+ years in the industry, including my work at Moovita. They do not necessarily reflect the views of any organization.
Enjoying this post? Subscribe to get more AI insights.